Getting sound cleanly from your decks to the speakers is one of the least glamorous but most important parts of DJing. The wrong cable, a mismatched signal level, or a single loose ground wire can turn a great set into a buzzing, distorted mess. This guide explains the connectors you will meet — RCA, XLR, quarter-inch and 3.5mm jacks, USB, digital and speakON — what balanced and unbalanced really mean, the difference between line, phono and mic level, and how to wire a typical setup so it sounds clean and stays reliable.
Why Cables and Connections Matter
Every DJ setup is a chain: a source (CDJ, turntable or controller) feeds a mixer, the mixer feeds an amplifier or powered speakers, and somewhere a laptop and headphones join in. The audio is only ever as good as the weakest link in that chain. Choosing the right connector for each job, matching signal levels, and avoiding interference is the difference between a rig that sounds full and quiet and one that hums or distorts.
Three problems cause most grief: using the wrong cable for the distance (unbalanced cables pick up noise over long runs), plugging a signal into an input expecting a different level (a line signal into a phono input sounds terrible), and ground loops that inject a low hum into everything. Understanding a handful of connector types and two core concepts — balanced vs unbalanced, and signal level — solves nearly all of them. For the gear at each end of these cables, see the related Gear and Software articles on mixers, audio interfaces and monitors; for getting levels right once everything is connected, see Gain Staging for DJs, and Audio Frequency Ranges Explained for why bass-heavy phono signals need special handling.
Analog Audio Connector Types
These are the physical connectors that carry analog audio around a DJ booth. Each has a typical job, and each is either balanced or unbalanced — a distinction explained in the next section.
RCA / Phono
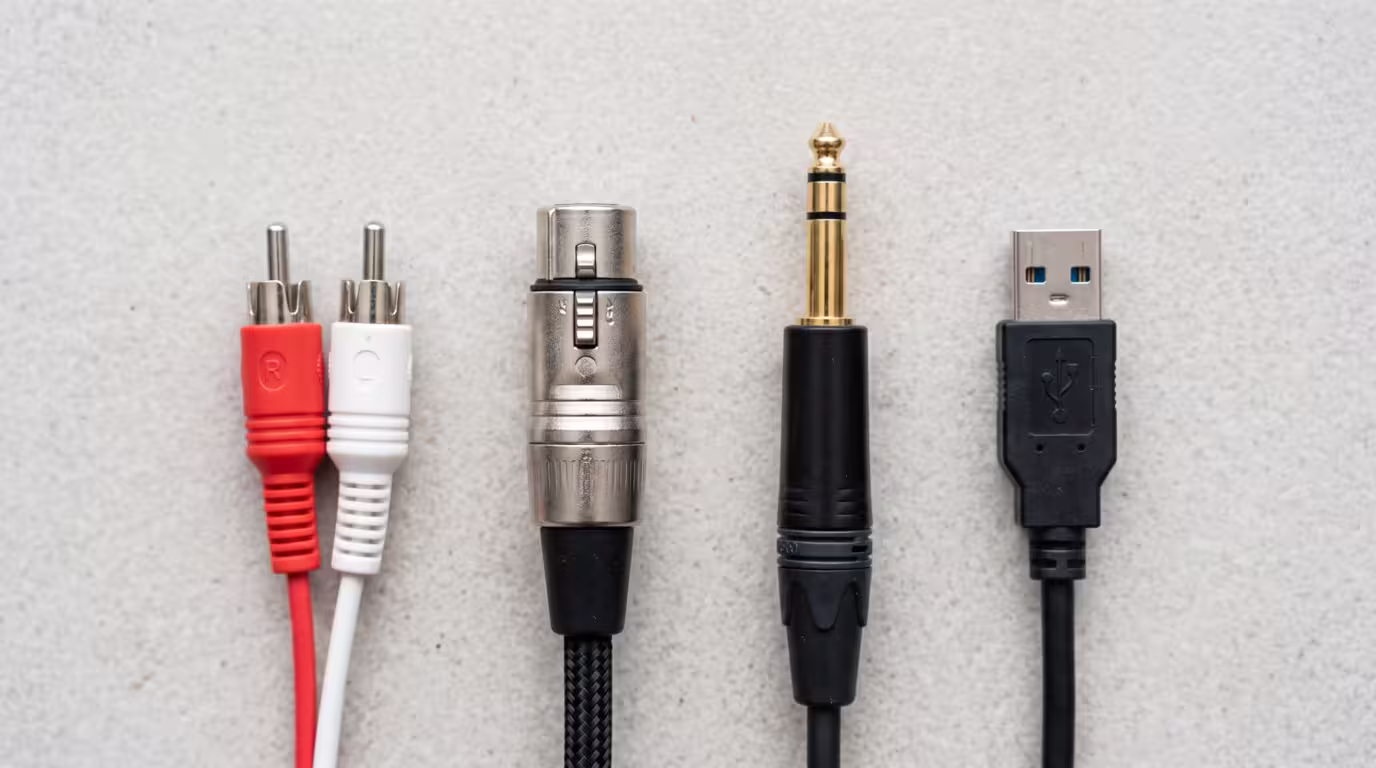
The RCA connector — the familiar red-and-white pair of plugs — is the most common connector in any DJ setup. It is unbalanced, with two conductors (a centre signal pin and an outer ground ring), and each plug carries one channel, so a stereo connection needs two. According to Wikipedia's history of the connector, RCA introduced it by 1937, using it inside an RCA model U-109 radio-phonograph and R-97 phonograph — it was designed to connect phonographs to radios, which is why the connector is also called phono. That history causes real confusion, because DJ gear uses RCA for two completely different signal levels: line level (a CDJ or media player output, or a mixer's master output to an amp) and phono level (the much weaker signal straight from a turntable). The connectors look identical; the signals are not. Because RCA is unbalanced and cheap, it is best kept to short runs — typically under about five metres — and inside the booth.
XLR
XLR is the professional standard for outputs. It is a rugged, three-pin connector with a locking latch, and it carries a balanced signal: pin 1 is ground/shield, pin 2 is the hot (positive) signal, and pin 3 is the cold (inverted) signal. That balanced design rejects noise over long cable runs, which is exactly why master outputs to a PA or powered speakers, and microphones, use XLR. On a club mixer the master output is usually offered on both XLR (balanced, for the main run to the system) and RCA (unbalanced). As Wikipedia notes, the XLR connector was invented by James H. Cannon, founder of the Cannon Electric company, which is why it is still sometimes called a Cannon connector; the letters refer to the X model connector with an added Latch and Resilient rubber around the female contacts.
Quarter-Inch Jack: TS and TRS
The 6.35mm (quarter-inch) jack comes in two forms that look almost identical but behave very differently. A TS (tip-sleeve) plug has two conductors and carries an unbalanced mono signal — it is the classic guitar/instrument cable. A TRS (tip-ring-sleeve) plug has three conductors and can do one of two jobs: carry a balanced mono signal (hot, cold, ground) or an unbalanced stereo signal (left, right, ground). As Sweetwater explains, TS cables are used for mono unbalanced signals, while TRS cables can carry either a mono balanced signal or a stereo signal. On DJ gear, TRS jacks are typically used for balanced booth outputs and for connecting to studio monitors and amplifiers, while the same connector format appears (wired for unbalanced stereo) on headphone outputs. The cable is the same; only the wiring and the equipment determine which job it does. It matters to use the right one: feeding a TS cable into a balanced TRS connection loses the noise-rejection benefit and can introduce hum.
3.5mm (Eighth-Inch) Mini Jack
The 3.5mm mini jack is the small consumer headphone/aux connector. In its TRS form it carries unbalanced stereo (tip = left, ring = right, sleeve = ground) — this is the aux cable you use from a laptop or phone. DJs meet it on laptop outputs, phone outputs and small headphones, and often need a 3.5mm-to-RCA adapter to feed a consumer source into a mixer's line input. Because it is small and unbalanced, it is fine for short runs but prone to wear and interference.
Headphone Connectors
DJ headphones almost always terminate in either a 1/4" or 3.5mm TRS plug, wired for unbalanced stereo (left, right, shared ground). Many headphones ship with a 3.5mm plug and a screw-on 1/4" adapter, because DJ mixers and controllers use a 1/4" headphone socket while portable gear uses 3.5mm. Note that a headphone TRS connection is stereo, not balanced — you cannot plug headphones into a balanced TRS output and expect them to work correctly.
The table below summarises the common analog connectors a DJ encounters.
| Connector | Balanced/Unbalanced | Typical DJ use |
|---|---|---|
| RCA (phono) | Unbalanced | CDJ/line outputs, turntable phono outputs, master to amp |
| XLR (3-pin) | Balanced | Master out to PA/powered speakers, microphones |
| 1/4" TS | Unbalanced | Mono instrument/line, some inputs |
| 1/4" TRS | Balanced (or unbalanced stereo) | Booth out, balanced line, headphones |
| 3.5mm TRS | Unbalanced stereo | Laptop/phone out, aux, headphones |
Balanced vs Unbalanced Audio
This is the single most useful concept for understanding cables. An unbalanced connection (RCA, TS) uses two conductors: one signal wire and one ground that doubles as the shield. It is simple and cheap, but the ground wire also acts as an antenna, so over long distances it picks up hum and radio interference.
A balanced connection (XLR, TRS) uses three conductors: a ground/shield plus two signal wires. The trick is differential signalling: the same audio is sent down both signal wires, but one copy is inverted (flipped in polarity). Any interference picked up along the cable hits both wires equally. At the receiving end the inverted copy is flipped back and the two are combined — which puts the wanted audio back in phase and cancels the noise, because the noise that was identical on both wires now cancels itself out. As Wikipedia's article on balanced audio clarifies, what actually makes this work is that the two wires have matched impedance to ground, not simply that the signal is split into opposite polarities; the result is strong common-mode rejection of noise.
The practical upshot for DJs is simple. For short connections inside the booth, unbalanced RCA is perfectly fine — most mixer inputs are RCA for exactly this reason. But for the long run from your mixer's master output to a PA system or a pair of powered speakers across a room, use the balanced XLR (or balanced TRS) output. Balanced cables can run tens of metres with virtually no added hum, whereas unbalanced runs start to suffer past a few metres. Balanced audio is not higher fidelity in itself — it is about noise rejection over distance.
Signal Levels: Line, Phono and Mic
A connector tells you nothing about the strength of the signal flowing through it, and getting levels wrong is one of the most common DJ mistakes. There are three levels you will meet:
• Line level is the standard operating level for most DJ gear — CDJs, media players, mixers and audio interfaces all work at line level. There are two flavours: consumer −10 dBV (about 0.316 volts) and professional +4 dBu (about 1.228 volts). Per Audio University, professional +4 dBu is roughly 12 dB hotter than the consumer −10 dBV standard (11.78 dB, to be exact).
• Phono level is the very weak signal that comes straight from a turntable's cartridge. A typical moving-magnet (MM) cartridge produces only a few millivolts — commonly around 3 to 5 mV — while low-output moving-coil cartridges produce just 0.2 to 0.5 mV. It needs a phono preamp that both boosts the signal to line level and applies RIAA equalisation, a standard curve that reverses the bass-cut/treble-boost applied when the record was cut. A phono stage typically provides roughly 35 to 45 dB of gain for MM cartridges and around 55 to 65 dB for low-output MC cartridges.
• Mic level is weaker still (roughly −60 to −40 dBu) and needs a microphone preamp to bring it up to line level.
This is why DJ mixers have a PHONO/LINE switch (or separate phono and line inputs) on each channel. Set it to PHONO for a turntable and the channel applies the preamp and RIAA curve; set it to LINE for a CDJ. Plug a turntable into a line input and it will be far too quiet and tonally wrong (no RIAA correction); plug a line-level CDJ or controller into a phono input and you amplify an already-amplified signal. As Sweetwater warns, DJ controllers are line-level sources, so you must not connect their output to a phono input — doing so amplifies an already-amplified signal, producing very loud distortion that can damage your speakers. The connectors are the same RCA on both, so the switch — not the cable — is what protects you.
The Turntable Ground Wire
Turntables come with a separate thin ground wire (usually with a spade or ring terminal) in addition to their RCA audio cables. This is not a mains safety earth; it ties the turntable's metal chassis and tonearm to the mixer's ground reference to stop a low hum. DJ mixers provide a dedicated ground terminal (often a knurled post marked GND or SIGNAL GND) next to the phono inputs — Pioneer/AlphaTheta DJM mixers, for example, advertise a large GND signal terminal so you can easily connect the ground wires from analogue players. Always connect the turntable's ground wire to it; forgetting to is one of the most common causes of turntable hum.

Digital and USB Connections
Modern DJing leans increasingly on digital and USB. A USB connection carries both audio and control data between a controller (or CDJ) and a laptop. On a typical controller, the unit itself contains the soundcard (audio interface): the laptop runs the DJ software, sends audio back over USB, and the controller's own outputs feed the speakers. With CDJs and a club mixer running DVS or HID control, a USB cable links the gear to the laptop for timecode and track data, while the mixer's built-in soundcard handles the audio. You will meet USB-A and USB-B (the common square-ended cable on most controllers and DJM mixers) as well as the newer USB-C.
Purely digital audio connections appear on higher-end mixers and players. S/PDIF carries two channels of digital audio either over coaxial cable with an RCA-style connector (often marked DIGITAL — do not confuse it with an analog RCA input) or over optical TOSLINK. The professional equivalent, AES3 (AES/EBU), carries digital audio over a balanced 110-ohm cable with XLR connectors. Because digital signals are far less vulnerable to interference, these connections do not need to be balanced for noise reasons, though optical does offer the bonus of breaking ground loops entirely, since there is no electrical connection between the two devices. Pioneer DJM club mixers, for instance, offer coaxial digital inputs and a digital master output alongside the analog connectors.
Speaker Connections
There is a fundamental split here that trips up beginners: powered (active) speakers versus passive speakers.
A powered/active speaker has its own amplifier built in, so it accepts a line-level signal directly from your mixer's master output — usually via XLR, TRS or RCA. Most modern DJ and PA speakers are active, which makes setup simple: a balanced XLR or TRS cable from the master out to each speaker and you are done. Almost all home and small-venue DJ setups use active speakers.
A passive speaker has no internal amplifier. It needs a separate power amplifier, and the amp connects to the speaker with speaker-level cable — a much higher-power signal than line level. In clubs and on larger PA systems this connection uses speakON connectors (Neutrik's twist-lock professional standard), and sometimes banana plugs, spade connectors or bare wire into binding posts. As described in Wikipedia's speakON article, these connectors lock in place and come in two-, four- and eight-pole configurations; they carry high current safely and keep the live contacts shrouded so you cannot shock yourself or short the amp.
The critical rule: speaker-level cable and line-level signal cable are not interchangeable. SpeakON connectors exist partly so you can never confuse a speaker cable with a line cable in a dark booth — plugging a line input into a speaker output (or vice versa) can damage gear. For choosing the speakers themselves, see the Gear and Software article on monitors and speakers.
A Typical DJ Setup, Step by Step
Here is how the cables fit together in three common setups.
CDJs and a club mixer: Each CDJ's audio output connects with a stereo RCA cable to a LINE input on the mixer (set that channel to LINE). The mixer's master output goes to the speakers — use the balanced XLR master out for the run to a PA or powered speakers, or the RCA master out for a short, simple connection. A booth monitor connects from the mixer's TRS booth output. Headphones plug into the mixer's 1/4" headphone socket. If you are using rekordbox or Serato with the CDJs, a USB cable links each device, and an Ethernet/LAN cable links CDJs and mixer for Pro DJ Link.
Turntables and a mixer: Each turntable's RCA cables go to a PHONO input (set the channel to PHONO), and — essential — each turntable's separate ground wire connects to the mixer's ground terminal. Everything else (master out, booth, headphones) is as above.
Controller and laptop: A single USB cable connects the controller to the laptop, carrying both control data and audio (the controller is the soundcard). The controller's outputs — RCA on entry-level units, XLR or TRS on larger ones — feed your powered speakers. Headphones go into the controller. For a longer run to a venue PA, send the balanced outputs, or use a DI box to convert an unbalanced RCA output to a balanced signal.
Avoiding Noise, Hum and Ground Loops
The classic audio gremlin is a steady low hum at the mains frequency — 50 Hz in most of the world, 60 Hz in North America (a ground-loop buzz often sits at the doubled 100/120 Hz). A ground loop happens when two pieces of connected gear are earthed through different paths at slightly different ground potentials; the loop acts as an antenna and induces a hum into the audio. The fixes, in order of preference:
• Power everything from the same source. Plugging all your gear into the same outlet or power strip — the same circuit — eliminates most ground loops by giving everything a common ground reference. Avoid running one piece off a distant outlet on another circuit.
• Use balanced connections (XLR/TRS) for long runs, which reject induced noise, and keep the turntable ground wire connected.
• Use a ground-lift switch or isolator where provided (some DI boxes and powered speakers have one), or a dedicated hum-eliminating isolation transformer for a stubborn loop. Never lift the loop by snapping the safety earth pin off a mains plug or using a cheater plug — that is a genuine electrocution hazard.
Beyond ground loops, good habits prevent most noise: use decent shielded cables, keep audio cables away from (and crossing rather than running parallel to) power and lighting cables, avoid unnecessarily long unbalanced runs, and check for loose or dirty connectors, which crackle and drop out.
Practical Tips and Common Mistakes
A few habits separate a reliable rig from a flaky one:
• Carry spare cables — always. Cables are the part of a rig most likely to fail, and a dead RCA lead five minutes before a set is a disaster. As DJ TechTools advises, the single biggest way to make sure every show goes off without a hitch is building in redundancy — bringing a backup of just about everything important. Pack backups of every cable type you use, plus the common adapters (RCA-to-3.5mm, TRS-to-XLR).
• Set PHONO/LINE correctly, and never plug a line-level controller or CDJ into a phono input.
• Use balanced (XLR/TRS) for the long master-to-PA run; keep unbalanced RCA short.
• Turn the system down before connecting anything, and power up in the right order — sources and mixer first, speakers/amp last (and reverse on shutdown). Digital DJ Tips explains why: powering up the PA last, with the volume down, avoids accidentally switching an audio source into a live system — which is what causes those loud pops, crackles and speaker-blowing badness.
• Connect the turntable ground wire.
• Don't confuse speaker cable with line/instrument cable.
• Buy decent, durable cables — but don't overspend. Build quality and connectors matter for reliability on gear that is plugged and unplugged constantly, which is why touring rigs favour Van Damme cable with Neutrik connectors. As London Sound Academy puts it, there is little point spending £100-plus on RCA cables to connect your CDJs to your DJM; on short or digital DJ runs, audiophile exotica makes little practical difference.
• Label and coil your cables so setup is fast and faults are easy to trace.
Key takeaways
• RCA is unbalanced and used for short line- and phono-level runs; XLR is balanced and the pro standard for master outs and mics; TS is unbalanced mono, TRS is balanced mono or unbalanced stereo.
• Balanced connections cancel noise over long distances — use XLR/TRS from your master out to the PA, and keep unbalanced RCA short.
• Line, phono and mic are three very different signal levels; set the mixer's PHONO/LINE switch correctly and connect the turntable ground wire.
• USB carries audio and control data between controllers/CDJs and a laptop; the controller is usually the soundcard.
• Most ground-loop hum is fixed by powering everything from one circuit and using balanced cables — never remove a mains earth pin.
• Carry spares, power up in the right order with the volume down, and buy durable rather than exotic cables.
Ready-made, exclusive EDM tracks with full rights — released as your own.
