Every great-sounding DJ set has an invisible foundation: levels that are set correctly at each point in the signal chain. That foundation is called gain staging, and it is the difference between sounding crisp, loud and professional and sounding distorted, weak or wildly inconsistent. This guide explains what gain staging is, how the DJ signal chain works, how to read your level meters, and a step-by-step method for setting your gains so your music hits hard without ever clipping.
What Gain Staging Is and Why It Matters
Gain staging is the process of managing the level of your audio signal at every stage it passes through, so each stage receives a signal that is strong enough to stay well above the noise floor but not so strong that it distorts. As the Wikipedia article on gain stages puts it, it is the process of managing the relative levels at each step of an audio signal flow to prevent the introduction of noise and distortion. Every point where you can change the level — a knob, a fader, an output control — is a gain stage, and good gain staging means each one is set in its sweet spot.
For DJs, that translates into three practical goals: clean, distortion-free sound; a healthy, loud-enough level; and consistent volume from track to track so the dancefloor never gets a nasty jump or a sudden drop. Get it wrong and the symptoms are obvious — harsh distortion, clipping that can damage a big system's tweeters, tracks that lurch in volume, or a thin, quiet signal buried in hiss. Get it right and you sound like you belong in the booth.
It helps to separate two words that get used interchangeably. Gain generally refers to the level going into a stage (the input), while volume or level usually refers to what comes out. On a DJ mixer, the trim sets the input level of a channel and the fader controls the output you send to the mix. Understanding that distinction is the heart of gain staging.
The DJ Signal Chain, Stage by Stage
Your sound travels a fixed path from the track file to the speakers, and every step is a gain stage you either control or hand off to someone else. The order matters: a level set too hot early in the chain stays distorted no matter how much you turn things down later.
| Stage | Control | Purpose |
|---|---|---|
| Track level | File loudness / software track gain | The mastered loudness baked into the track |
| Channel input | TRIM / GAIN knob | Sets the incoming level for that channel |
| Tone shaping | Channel EQ | Boost/cut frequencies (also changes level) |
| Mixing | Channel fader | Relative level and transitions |
| Switching | Crossfader | Blends or cuts between channels |
| Final output | MASTER level | Overall signal sent to the system |
| Monitoring | BOOTH level | Independent monitor feed for the DJ |
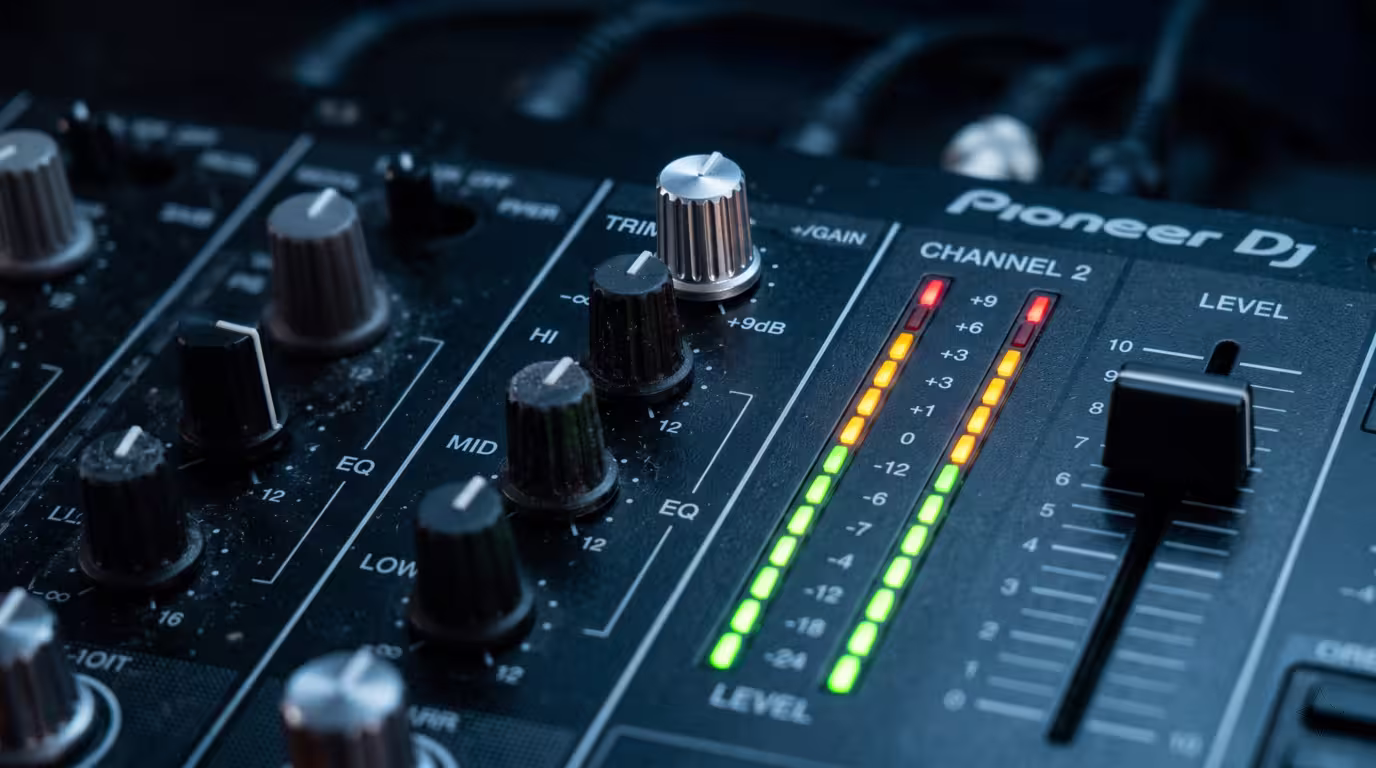
The official Pioneer DJ / AlphaTheta documentation describes the three core volume controls clearly: TRIM adjusts the level of the sound coming into each channel, the channel fader adjusts the level going out of each channel for mixing, and the MASTER LEVEL adjusts the overall output sent from the mixer to the system. In other words, trim is for setting a channel's level, the fader is for mixing moves, and master is for the room — and once you find a good master level, the manufacturer notes you are unlikely to need to change it during your performance.
The booth output deserves special mention. The BOOTH (or BOOTH MONITOR) knob sets the volume of your monitor speakers in the DJ booth completely separately from what the crowd hears, so you can turn your own monitoring up or down without touching the master going to the dancefloor. Pioneer's DJM-800 manual states this plainly: the booth volume is controlled by its own BOOTH MONITOR dial, independently of the master output level. This independence is exactly why experienced DJs monitor on the booth feed and leave the master set at its optimal level.
Reading Level Meters: Green, Amber, Red
Your meters are the dashboard of gain staging. They show how close your signal is to the digital ceiling, measured in dBFS (decibels relative to full scale), where, per the Wikipedia entry on dBFS, 0 dBFS is assigned to the maximum possible digital level. That ceiling is the clipping point. Everything you do is about keeping peaks below it with a little room to spare.
Most mixers and DJ apps colour their meters in three zones. The convention is consistent across brands.
| Zone | Meaning | Action |
|---|---|---|
| Green | Healthy average level | Good — this is where you live |
| Amber/yellow | Peaks and transients | Fine for occasional peaks |
| Red | At or near clipping/overload | Back off — never sit here |
The widely taught approach is to set levels so the loudest parts of a track peak around the top of the green and into the amber, with the red reserved as a warning you should rarely if ever trigger. Serato's official guidance is to keep the deck output level in the yellow segments for the loudest parts of a track, and to keep it out of the red at all times. Native Instruments says much the same for Traktor in its Digital DJing and Sound Quality support article: set your gain so the level peaks still reach the orange area of the main level meter, which is the headroom range.
Manufacturers even publish target numbers. AlphaTheta (Pioneer DJ) recommends that on its mixers you do not exceed roughly the upper part of the channel meter and keep the master out of the red to prevent sudden spikes in volume, noting that a CLIP indicator will quickly blink to flag internal digital clipping. The exact calibration differs between models, so the safe universal rule is simpler than any single number: peaks in the green-to-amber, master out of the red.
Clipping and Distortion: What You're Avoiding
Clipping is what happens when a signal tries to exceed the maximum level a stage can handle. The peaks have nowhere to go, so they get flattened — a smooth waveform literally has its tops and bottoms chopped off and turns into something closer to a square wave. The Wikipedia article on audio clipping explains that in the frequency domain, clipping produces strong harmonics in the high-frequency range, and that this extra high-frequency energy can make tweeter damage more likely than an unclipped signal.
That last point is why sound engineers are so protective of their rigs. Digital clipping is harsh and unmusical, and on a powerful PA the burst of high-frequency energy from a clipped signal can cook tweeters and voice coils. Worse, clipping anywhere in the chain is permanent for the rest of the chain: if you overdrive the channel, turning the master down afterwards just gives you quieter distortion. You are amplifying an already-broken signal.
It is worth distinguishing a clipping channel from a clipping master. A single channel running into the red distorts that track before it is even mixed; a clipping master distorts the entire blend on its way out to the system. Both are bad, and the fix for both is upstream: lower the gain that caused it, not the control after it.
Headroom: Leaving Room to Breathe
Headroom is the safety margin you leave between your normal signal level and the clipping point. The Wikipedia definition calls it a safety zone that lets transient audio peaks exceed the nominal level without damaging the system or the signal through clipping. In digital audio it is simply how far below 0 dBFS your signal sits.
For DJs, headroom matters because music is full of sudden transients — kick drums, snares, percussion — that spike well above the average level. If you run everything maxed out, those transients have nowhere to go and clip. Leave headroom and they pass through cleanly, your sound stays dynamic and punchy, and you keep a little wiggle room to push a track or ride a fader during a mix without slamming the ceiling. Running the whole chain flat-out is the opposite of headroom, and it is the most common reason DJ sets sound crunchy.
The Practical Gain-Staging Method
Here is a reliable, repeatable routine you can run at the start of any gig or set. The principle behind it is to raise levels in order down the chain so each stage receives an optimal signal, then leave them alone.
1. Set a sensible starting point. Put the master at a reasonable level (around unity or 12 o'clock is a good default), channel faders down, EQs flat (12 o'clock), and the booth wherever you need to hear yourself. If you are inheriting a setup mid-night, do this carefully and conservatively.
2. Gain to the meters, one channel at a time. Play a track at its loudest point, push the channel fader to your normal mixing position (usually the top), and adjust the TRIM so the channel meter peaks at the top of the green and just into the amber. AlphaTheta's own setup instruction is to adjust TRIM so the orange indicator on the channel level meter lights at the peak level. This is the highest your channel should ever read.
3. Match each new track to the one playing. Because tracks are mastered at very different loudnesses, the trim is your tool for evening them out so the incoming track sits at the same perceived level as the outgoing one. Use the meters as a guide and your ears as the judge — a quiet, older track may need the trim pushed up, a brick-mastered modern release pulled down.
4. Set the master and leave it. Bring the master up until the master meter sits in the green and just touches amber on peaks, staying clear of the red. Then stop touching it. If the room needs to be louder, that is the job of the house system or the engineer, not your master knob.
5. Use faders for music, not for fixing levels. Once trims are set correctly, your channel faders should be free to do their real job — transitions and dynamics — without anything clipping. If you find yourself yanking a fader down just to stop distortion, the trim was set too hot.
The mental model to keep is structural gain: the loudest your signal ever gets, anywhere in the chain, should land just below where the meters clip. Set that ceiling once, correctly, and everything downstream behaves.

Matching Levels Between Tracks
Nothing exposes weak gain staging faster than a volume jump mid-mix. The cause is almost always loudness differences between masters: a track from a small label or an older release can be several dB quieter than a freshly mastered club banger, so dropping one in after the other produces an audible lurch unless you compensate with the trim.
Software helps here. Serato, rekordbox and Traktor all analyse your library and calculate an auto-gain value designed to even out perceived loudness. Serato describes it as the gain adjustment required to match a track's perceived loudness to a reference level; that reference is adjustable from 89 dB (quieter) to 98 dB (louder), with 92 dB as the recommended default. rekordbox's normalize function works the same way — its manual frames the feature as adjusting the volume of sources automatically and saving tracks at a common volume, so during playback you don't have to adjust each track. These features genuinely reduce how much trim-riding you have to do, and they are worth enabling and letting analyse your whole collection.
They are not magic, though. Auto-gain matches average loudness, not peaks, so you still watch the meters and trust your ears — especially for tracks with wide dynamic range or quiet intros. (For more on how loudness and dynamic range relate to file quality, see the companion articles Sample Rate and Bit Depth and Bitrate and Audio Quality.)
The Limiter and the Master Output
Most DJ mixers and software include a limiter on the master that catches peaks before they clip. On Pioneer DJ's DJM mixers it is the PEAK LIMITER function, which the official documentation says alleviates sudden, unpleasant digital clipping of the master output. Traktor's limiter does the same job in software; Native Instruments recommends enabling it because a limiter avoids digital clipping at the cost of some dynamic range.
The key word is safety net. A limiter is there to save you from the occasional accidental peak, not to be a tool you mix into. Lean on it constantly and it squashes your dynamics — Native Instruments notes the sound will slightly lose dynamic range (perceived as a lack of punch) when the limiter is working hard, and most modern dance tracks are already heavily compressed, so piling on more makes them sound worse. Set your gains so the limiter rarely engages.
Note too that the limiter generally protects only the master. On DJM mixers the peak limiter is not installed on the booth output, which is another reason the booth feed is for your ears only and the master is what goes to the carefully gain-staged PA. Pioneer DJ's mixers can output high, clean levels — AlphaTheta's support site confirms that with the master attenuator set to 0 dB the output stays undistorted up to +25 dBu on the MASTER1 (XLR) output and +21 dBu on MASTER2 (RCA) — so there is rarely any need to push into the red to get loud.
Software vs Hardware: Same Principle
Whether you are on CDJs and a standalone mixer or an all-in-one controller running rekordbox, Serato or Traktor, gain staging works identically. Hardware mixers give you physical trim knobs, channel faders, master and booth controls, and LED meters. Software gives you per-track gain (and auto-gain), channel meters, an internal limiter and a master output level. The controls have different shapes but the chain and the logic are the same: set the input level to the meters, match tracks, keep headroom, protect the master.
One software-specific tip: in apps like Traktor, the master output knob's 0 dB is the maximum, not a neutral middle, so it is common practice to pull the software master down and gain back up on your hardware or amp to keep healthy headroom. Native Instruments even builds this in — in external mixing mode Traktor applies a fixed −3 dB headroom value to each channel to leave room for extra decks and effects. Check your software's own level guidance, because Serato, Native Instruments and Pioneer DJ all publish it.
Common Mistakes to Avoid
The single biggest error is redlining — running channels or the master in the red in the belief that more gain equals more loudness. It does not. Past the ceiling you are not getting louder, you are getting distorted, and on a real system you risk damaging it. "If it ain't redlining, it ain't headlining" is a myth; professional sound is clean sound. As guest contributor DJ Soo writes in DJ TechTools' well-known guide on gain staging, any professional system is gain-staged during setup to sound ideal when the mixer is hitting right before the reds — so pushing past that point just makes everything sound worse.
Other frequent traps:
• Cranking the master to get loud instead of letting the house system or engineer raise the room. Your master should be set once and left.
• Using the channel fader to fix big level differences between tracks — that is the trim's job. Faders are for mixing.
• Ignoring the meters entirely and mixing by feel until something distorts.
• Gaining too low, leaving a weak signal that someone amplifies later, dragging up hiss and noise along with it.
• Relying on the limiter as a crutch rather than setting gains properly.
• Boosting EQ heavily, which adds level and eats headroom. EQ boosts can push a perfectly gain-staged channel into the red without you realising; the standard DJ advice is to cut rather than boost. (See the companion article EQ Mixing and Bass Swaps for the full technique.)
If you record your sets, the same discipline applies to your capture levels and recording headroom — covered separately in Recording Your DJ Mix — but the live chain above is what keeps the room sounding clean in the moment.
Key takeaways
• Gain staging means setting the level at each stage of the chain so the signal is strong but never clips.
• The chain runs track → trim → EQ → fader → crossfader → master/booth; set trim for level, faders for mixing, master for the room.
• Set trim so the channel peaks at the top of green into amber with the fader up; keep the master out of the red.
• Match each incoming track's loudness to the one playing using trim, meters and ears; auto-gain helps but isn't perfect.
• Leave headroom, treat the limiter as a safety net, and never redline — loud comes from a good system, not a red meter.
Ready-made, exclusive EDM tracks with full rights — released as your own.
